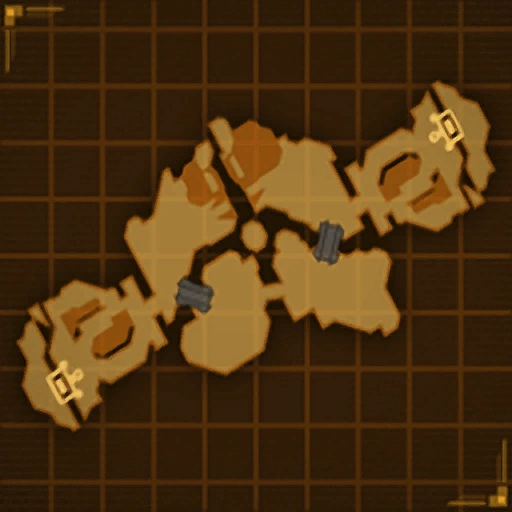
Outpost X12 is a map in the multiplayer mode in Up Your Arsenal. It is almost identical to the Outpost X12 region on planet Aridia, featured in the Galactic Rangers' Operation: DEATH VALLEY. The map consists of six islands, three of which are almost mirrored save for a few changes in the middle, surrounded by a large canyon around the islands. Each base sits on either the bottom left or top right corner of the map, behind a tall structure placed within the canyon. The islands are connected by various bridges, some of which can be traversed with the Gravity Boots.
Notably each base has a Morph-o-Ray, and a turret that can be controlled by a player. The player-controlled turret is useful for defending the base from an attack, and though it can also be controlled by the opposing team to attack the base, it will be quickly destroyed by the base defenses. Past the base are three different routes to the first node, a grav-ramp tunnel, a small bridge, and a grav-ramp to a taller plateau that connects to an area behind the base and a third grav-ramp tunnel. The latter tunnel contains a pair of Charge Boots, but can only be traversed while upside-down, whereas the area behind the base hides a Mine Glove and Holoshield Glove.
The first node is contained within the tall structure in the path from the base to the islands in the main area. The node has two basic turret defenses and two turbosliders, and capturing it will release a Minirocket Tube and a Lava Gun. As it is along this path, either team will have to capture this node as the first thing they do. Past the first node for either team is a small tunnel and a bridge leading onto the first main island from the base, either leading right or left from the base depending on the team. The team's second node will be reached using a bridge from the first.
Map of Outpost X12
To the right from the base is a node on top of a plateau reached using a grav-ramp, and capturing it will provide a hovership, Lava Gun, and Charge Boots. To the left from the base is a node containing an anti-vehicle missile turret. The node is on top of a large plateau, reached by climbing an adjacent plateau and crossing a (destructible) bridge. Atop the plateau used to reach the node is a squad of drone bots, and capturing the node will release a Morph-o-Ray and a Minirocket Tube.
In between these sets of islands are a few differences depending on the map. On the bottom half of the map is a long bridge connecting the blue team's missile turret node with the red team's Hovership node. Underneath this bridge is a grav-ramp where a Morph-o-Ray and Charge Boots can be obtained, and alongside it are versa-targets allowing players to Swingshot across and bypass the bridge. In the center of the map is a round, metal platform with a player-controlled turret, which can provide a strategic advantage to either team in allowing a team to target nearby vehicles or players around this area of the map, and can only be reached using the Swingshot or a Hovership.
At the top of the map, connecting the blue team's Hovership node island with the red team's missile turret node island, is a large mirrored ramp that can be used by turbosliders to reach the opposite island, and a gap to the left of it that can be crossed with the Swingshot. To the right from this ramp is a set of versa-targets that can be used to either bypass the ramp and go around to reach the opposite island, or to reach one of two smaller plateaus connected to a grav-ramp that leads to the top of one of two tall crevices. At the top of both crevices is a Flux Rifle, and these areas provide a convenient vantage point to snipe other players.